healing cuisine logo

healing cuisine logo
Showing posts with label Green Living. Show all posts

Thursday, April 18, 2013

Heal Canker Sores Naturally

Most of us have experienced one of these in our lifetime.  A canker sore is a little ulcer inside your mouth or on your tongue.  It can be very annoying while you have one.  A canker sore can result from a few different things: stress, accidentally biting your mouth, braces rubbing your mouth, spicy or citrus food (or another food trigger), abrasive foods (chips, popcorn, nuts, etc), vitamin or nutrient deficiency, gastrointestinal issues, or a weak immune system.  One or more of these could be causing your canker sores to appear, last longer, and hurt more.

Canker sores can be extremely painful, especially if you eat spicy or citrus foods.  They also last for 1-2 weeks before finally healing up.  It's not fun to have one! 

The reason I'm posting on this topic is because my husband experiences canker sores often from nicking his mouth with his teeth while chewing food.  He's always had the problem since he was young.  Over the years we have developed a game plan to help prevent the pain and suffering that comes with a canker sore and to boost the healing time so he doesn't suffer for the full 2 weeks.  Here are our tips to healing canker sores faster naturally.

Heal Canker Sores Naturally

1.) GET ADJUSTED  Your body has an amazing ability to heal itself.  That power starts in the brain and travels down through the spinal cord out to every organ and cell of your body.  Chiropractic looks for any interference in the spine which prevents the healing power from traveling to the places it needs to. Each adjustment has been shown to boost immunity anywhere from 200-400%.  When a canker sore is present, it's time to boost your immune system, and I know no better way to do that than a chiropractic adjustment from my Maximized Living chiropractor.  If you are looking for a Maximized Living chiropractor near you, visit MaximizedLiving.com and search your zip code or address.

2.) ELIMINATE TRIGGER FOODS  These are most commonly anything spicy or citrus, but you may notice your canker sores come on after eating a certain food or ingredient.  Once you narrow down on your trigger, eliminate it as much as possible from you diet.  This will help your canker sores heal faster, and will help prevent future canker sores from developing.

3.) CUT OUT ALL SUGAR  You should hop on the Advanced Plan strictly while experiencing a canker sore.  The Advanced Plan will help you cut out all sugar which causes inflammation in the body.  The less inflammation present in the body, the faster your body can heal.

4.)  L-LYSINE  Lysine is one of the 9 essential amino acids (your body cannot make it on its own) and is one your body needs for tissue repair and growth.  You may also see relief by supplementing Lysine for cold sores or shingles sores.  1,000 mg 3 times daily until the canker sore heals.

5.) BRUSH AND RINSE OFTEN  This helps to keep your mouth clean and limits the canker sore's exposure to bacteria which can make the canker sore last longer and more painful.  Use a natural (or homemade!) toothpaste without SLS or other chemical ingredients that are shown to further irritate or even cause canker sores.  Follow brushing your teeth with a mouth rinse of hydrogen peroxide.  This helps to clean out the canker sore and actually eases the inflammation and pain.

6.) B-COMPLEX VITAMIN + ZINC  Look for a B-complex that has B-6 and B-12.  Canker sores can be caused by a B-6/12 deficiency or they can stick around longer if you're low in either of these.  Likewise, a deficiency in zinc can both cause or worsen a canker sore.

Tuesday, March 12, 2013

How To: Homemade Baby Formula

The science is out.  Nothing comes close to true breast milk, because there is an innate connection between baby and mother.  When baby latches onto mom's breast, baby's saliva tells mom's body what baby needs (more water, protein, fat, nutrients, etc).  Our bodies were amazingly designed!

BUT, that doesn't mean everyone is blessed with an easy time breastfeeding or the ability.  I do recommend trying everything you can to keep your natural milk supply going first before jumping into supplementing milk for your baby.  Explore all avenues before settling on formula.  You can try many things...supplements like fenugreek and nettle, extended naked chest time and "kangaroo care" with your baby, extra pumping time to increase your flow are a few common methods.  (Email me if you would like other methods, or contact your local Le Leche League.)  But sometimes no matter how hard you try you cannot keep your milk supply going, or the nursing experience does not go well for mom or baby (extreme pain, inverted nipples with a struggle to keep baby latched).  Or perhaps you are adopting a child and do not have access to donor breast milk.  After you have weighed out all your options, these are the cases where proceeding with a homemade whole food breast milk formula is a good decision.

Today I would like to share my whole food formula recipe that when used as supplement will be closer to a woman's breast milk than one with synthetic vitamins and nutrients found at the store. I will write next week about why I recommend making your formula at home using whole food ingredients versus buying a store bought formula.  There are many many many reasons why making your own is important for the better health of your baby.  For time's sake, I will save that conversation for another day. (I will come back to link it when I post it!)

This is my recipe for homemade whole food infant formula.  It is based off of Sally Fallon's recipe in her book Nourishing Traditions.  (Every home should have this book on the shelf!  It's a go-to wellness resource!  Thank you Allison for the best wedding present ever!)  I have edited Sally Fallon's recipe to make it allergen-free as most of my clients and their children have an array of milk/nut/grain allergies.  I have listed alternative options in parentheses.


Homemade Whole Food Infant Formula
Based on Sally Fallon's original recipe found in Nourishing Traditions
Makes about 36 ounces

LIQUID
2 cups of rice milk (make your own via this link) (you can also use raw cow's milk or raw goat's milk)
2 cups pure water (reverse osmosis + remineralized is best)
2 Tbsp full fat coconut milk (or organic 100% grass fed heavy cream)
2 Tbsp organic unrefined coconut oil, melted
1/2 tsp fermented cod liver oil
1 tsp  extra virgin olive oil

DRY
1 Tbsp organic pea protein (or 1/4 cup organic 100% grass fed whey protein)
2 tsp gelatin from 100% grass fed cows
1/4 tsp Acerola powder
break open 3 capsules of colostrum

Add the rice milk to the blender with all of the dry ingredients.  Blend on Low-Medium until blended smooth.  Add remaining liquid ingredients to the blender and blend on Low-Medium until smooth.  Pour into bottles and store in fridge with airtight caps up to 5 days.  Warm each bottle in a container of warm water on the counter before feeding, and shake well.

You may notice the cold formula will be chunky from the fridge -- that's just the coconut oil and other oils solidifying from the cold.  It will thin out once it is warmed.  Do not heat the formula on the stove top.

Disclaimer: Before using any infant or toddler formula with your child, please consult with your pediatrician or main family practitioner. No parents should use this information without first seeking advice from their pediatrician or primary care physician before starting a nutritional program with their children.

Monday, October 29, 2012

6 Ways to Rebalance Hormones Naturally

Hi all!  I'm back and feeling fabulous!  That two week break was much needed and appreciated.  I am still catching up on emails, so please do understand if you haven't hear back from me yet.  There are a lot of questions to answer, some of which are coming up in today's post.

Many of you asked me to share what I did over the past two weeks to revamp my health.  Let me first explain a little of what I've been feeling health-wise and why I felt was time for a revamp.

Hormone imbalance is something I am predisposed to.  I have battled it my entire life.  In 2008, doctors had told me it was unlikely I would conceive.  While I never got a "medical diagnosis," it was likely I had PCOS and possibly cancer cells forming on my reproductive organs.  I decided to take a natural approach to healing.  While taking courses along the way so I could teach the natural detox processes to my own clients, I underwent a year long full body detox process of balancing my hormones and healing my organs.  After going through the completely natural healing process, I finally knew what it felt like to be healthy and living at my optimal potential for the first time in my life.  And shortly after, we were overjoyed to learn that we were expecting our son, Austin.

Since he was born, I have exclusively breastfed my son.  Long story short, after the first few weeks I learned that I wasn't producing enough milk that Austin was asking for on a daily basis.  Trial and error, it turned out I wasn't eating enough carbs.  I was eating Advanced Plan after the birth, but my body needed more carbs to turn into milk.  The things that worked best were oatmeal, brown rice, quinoa, and sprouted grains.  Eating a serving of one of these with almost every meal was basically essential to making enough milk for my little man.  As long as I did it daily, we had no supply problems come bedtime.  But what I knew is that sugar is a huge offset to my hormonal balance.

My body slips back into hormonal discourse very easily.  I knew what to expect: weight gain, bloating, fatigue, brain fog, and blemishes.   Now, I was not at all concerned with fast weight loss after pregnancy.  I trusted my body and the breastfeeding process.  However, I have noticed I have gained over 15 pounds since a year ago.  The bloating has been particularly bad in the last few months, and my memory is all over the place, which is just not me!  These were my wake up calls.  It was time to get things under control again.

Austin has started eating food in the last 2 months.  He's been pretty good about eating breakfast and dinner with me every day.  We still breast feed at least 3 times a day, but his feeding frequency has cut about in half from where we were 2 months ago.  I figured this would be the perfect time to make some diet changes (i.e. THE ADVANCED PLAN) and begin a few supplements to casually support hormone balance.  (Note: I am not doing a full hormone or estrogen detox.  While breastfeeding, you want to avoid any supplements that will cause your body to dump toxic estrogen from the body, and essentially into the milk your child will drink.)

I wanted to take two weeks for some ME time because I have also been feeling like I neglect myself since becoming a Mom.  I can see your heads nodding.  It's true, once you become a Mom you put your family's needs first every single time.  But, as we teach our patients, if YOU aren't healthy who will take care of them?  It was time for some Elise focus!  Daily devotions and bible time, bath time without baby, meditation time to clear my brain, and exercise every day.  (Oh yeah, I have probably never mentioned how much I HATE working out??  I've never been athletic.  I always had crafts or something indoors I wanted to be working on.  I still cling to that mindset unfortunately.  Blogging, dishes, cooking...there's always something I would rather be doing.)  I usually get a burst workout in about once a week, but in order to keep my hormones in sync and my weight healthy, I needed to get consistent with at least 3 times per week workouts.

Okay, so here is what I did to revamp my health in 2 weeks!

How To Rebalance Hormones Naturally

#1)  Exercise

Exercise is a huge component for hormone balancing.  Weight training in particular causes a lot of healthy hormone reactions that in turn work to reboot and rebalance.  I recommend consistent burst or surge style exercise for maximum rebalancing affect.

This was a huge one for me personally.  It's all about getting into a consistent routine of both aerobic and weight training.  My 2 weeks of health revamp fell perfectly in line with a boot camp a friend who is a personal trainer was hosting near our home.  It was exactly what I needed as far as accountability.  I also learned a lot of new workout moves to keep the variety going.  This was my first experience with personal trainers and I've got to say I really enjoyed it!  If you are like me and need that accountability and/or a little guidance along the way, I highly recommend looking into a trainer.  The boot camp was so fun!  I worked out burst style 6 days per week, and 4 of the days we were required to do 2-a-day workouts.  Cardio in the morning, weight training in the evening.  I thought I was going to die, but actually those days I felt AMAZING!

#2)  Nutrition & Diet
Guide to the Advanced Plan
I don't mean start counting calories.  Focus on clean eating and cutting out sugar, caffeine, bad fats, dairy, conventional meats, non-organic produce, and anything else that contributes to hormone offset or weight gain.  The cleaner you eat, the better your body will be at detoxing naturally.

For me, this meant two weeks of strict Advanced Plan.  I was so happy that my milk supply was fairly steady with Austin's nursing demands after cutting out the grains!   We had a couple nights at the beginning that I needed to have a little more kale protein shake to catch up from all the exercise I was doing, but we figured it out and the rest has been going great!  I've been trying to eat raw as much as possible.  You'll notice the bloat will dissipate quickly by cutting out the grains.

#3)  Reduce Stress & Fill Your Cup
Schedule in YOU time, reduce daily stress, and get plenty of rest.  I've learned that it's so so important to have some time to yourself on a daily basis to "fill your cup."  Do something you love every day to recharge your batteries!  For me, it's trying out a new recipe in the kitchen while daddy watches the baby, visiting a girlfriend kid-free, working on a craft while Austin naps.  Even if it's just 15 minutes of reading a new book, I always feel better after getting some alone time every day.  The happier you are on a daily basis, the better your hormones will be at adapting to the day's stress and changes.

It's also a good idea to incorporate some meditation and/or stretching, or some other way to clear your mind and relax your muscles daily.  For me and many of my female clients in the past, it's hard to reduce stress in our every day lives.  I find my day goes better if I take just 10 to 20 minutes in the morning to pray, dive into a daily devotions book, read my Bible, or look out the window at nature.  This time is for thinking about you, giving thanks, and clearing your head.  Do not think about your to-do list or what the day will bring.  Unplug for this short time and let the stress melt out of your muscles.  I like to get on the floor and stretch out while I meditate on a prayer or happy thought.  Each line of the prayer is a new stretch or pose.

Sleep is just as important.  When you sleep, your body reboots.  Getting enough sleep each night will give your body the best chance to heal where it needs to.  If you aren't getting enough sleep (6-8 hours a night at least!) then your body will never be balanced.  It's as simple as that.

#4)  Chiropractic & Spinal Correction
Specifically, Maximized Living doctors work to correct the physical structure of the spine when your structure has curved or lacks the perfect structure needed for optimal nerve function.  The doctor can look at your thermal nerve scan or xray and see if your endcrine system or specific reproductive organs are being affected at the root level.  If there is pressure on the nerves, they can then work to remove that pressure and help your body correct the structural problems for a healthier future.  I cannot recommend getting in to see your local Maximized Living chiropractor strongly enough!  If you're going to pick one thing on this list to do, this is the one, because without 100% nerve function going out to your endocrine system, how can you expect anything else on this list to work for those organs?  You don't know until you get checked.  Definitely get checked so you know what is happening inside!

I didn't know until I got checked either.  My first exam warranted a set of xrays be taken.  I had no idea I had a 12 degree scoliosis in my low spine, RIGHT at the nerves going out to my uterus and adrenal glands.  I also had lost the good curvature in my neck, and the straightened out structure was putting pressure on the nerves going to my hypothalamus, pituitary, and thyroid.  It took some time to get my spinal structure corrected, but with each adjustment I felt better.  I had more energy.  I felt like my food was digesting better.  As time went by, my menstrual cycles returned after over 2 years of none.  Weight dripped off my body without even trying to workout.  My metabolism was on the rise!  And my vision improved, I no longer needed to wear my weak strength glasses.  My doctor (aka my husband Dr Dave -- I am so blessed!) monitored my progress along the way.  It was so reassuring to see on the follow up xray that all my hard work was paying off.  I could see the structure correction happening right on the xray!  It wasn't until we had corrected the scoliosis completely that my hormones were completely rebalanced and my endocrine system in sync.  A month after finishing my spinal correction, we conceived.  It was a complete surprise, because I didn't know still if my body would ever be strong enough to hold onto a baby and care for it.  God blessed us powerfully that day!

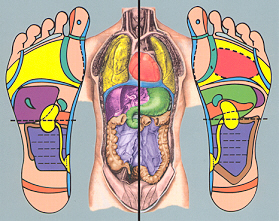
#5)  Acupressure or Acupuncture
Acupressure and Acupuncture work by stimulating reference points along the body that refer back to specific organs in a means to create healing response.   I really believe in coupling either of these methods with Chiropractic as a method of long term optimal wellness.  Your care provider will be able to specifically focus on your endocrine system, which will help your body put extra attention and energy into those organs and get them working together again faster.

In the past, while trying to beat infertility, I have seen an acupuncturist.  Currently I am seeing a reflexologist.  Both methods are wonderful, but I think I prefer the reflexology personally.  [If you are in the Charlotte area and need a great referral, the woman I see for reflexology is wonderful!  Top notch!  And affordable!! Email me.]

#6)  Supplementation
There are a few more specific supplements than the ones I am about to list that I recommend for hormone balancing and detox.  If you think you are a candidate for a more intense estrogen cleanse or a complete hormone/endocrine system overhaul, please email me to schedule a consultation.  I offer detox consultation packages via Skype or phone.

As I am still breastfeeding, I am taking a very mild approach with my supplements.  I don't want my body to go into full detox dumping mode because any excess estrogen shed will most likely go into my breast milk.  Two weeks ago, and for a while after giving birth, I felt like my body was heading downhill.  I had to be patient and wait to make some changes until Austin wasn't depending on me for food so much.  I wanted to add a few things in to my diet that would stop the downhill progression and help my body to start climbing the other way.  I'm not going for a shock method, but a gradual flip.  I added in:

Nutiva Hemp Oil
raw maca powder

-  Magnesium & zinc

Vessel Care (the best complete B complex vitamin formulated for optimal methylation; order through me)

Phytoganix (my favorite way to get phytonutrients like spirulina and acai; order through me)

Estrium (a 'medical food' powder full of herbs and supplements that work to reverse hormone imbalance; order through me)

-  Omega 3s (I added extra raw hemp oil and coconut oil to my diet)

-  And my usuals: Vitamin C, liquid Vitamin D3, probiotics, kombucha and Dynamic Greens (the best organic antioxidant drink I have found!)

Feel free to contact me with any questions.  And again, if you think it's time to take charge of your health and do a hormone reset, please email me to schedule a consultation: elise@healingcuisinebyelise.com.

Monday, August 27, 2012

School Lunches Part 1: The Tools

Happy first day of school to many of you!  Back-to-school time leaves many of us moms wondering how we can maximize our kids' lunches with nutritious whole food meals.  I have lots of tips to help make lunch sack packing less of a chore and recipe ideas sure to keep your child happy!  I am breaking this School Lunches series into parts to make it easier for you to follow along.  Today is Part 1: The Tools.  I'm going to share my favorite tools and "go to" items that can be used as staples throughout the year.

Some of you may be remembering while I do have a child, he is only 11 months old.  "How could Elise know how to pack school lunches?"  Well, let's just say I have packed hundreds of lunches in my day.  I hated eating out in undergrad, but was on campus usually from 7am-9pm most every weekday.  I did a lot of lunch and snack packing.  And while my husband was in grad school, I sent him off with a packed lunch every day of Advanced Plan foods.  (His favorite thing to find in his lunch box to this day is "ants on a log.")  I had also spent 3 years as a part-time nanny for several families in the Twin Cities area, and was in charge of carting the kiddos around and managing our afternoon lunches.  That was a pretty eye-opening experience for me.  I learned that kids, even from families who eat organic foods, can still be picky eaters.  That was when I started experimenting with other ideas, like food shapes and smoothie pops and recipes that keep kids engaged through lunch time.  I am excited to share these ideas with you and hope you and your child enjoy making and eating them!

School Lunches Part 1:  The Tools

Start out the year with non-toxic reusable lunch boxes, water bottles, and utensils.  Some of my favorites:

Ziploc divided storage
-  Bento style lunch boxes.  The bento style means the box has separated compartments for each food/side dish.  You'll use less plastic or paper baggies separating foods this way.  Everything packs neatly into one slim container.  They make 18/8 grade stainless steel options like this box style or this stackable tiffin style.  I also really like the plastic Ziplock bento style as an option (Rubbermaid makes a similar product), especially when a liquidy side dish is packed as the Ziplock lid will be more leak proof compared some stainless steel options out there.  Obviously the 18/8 grade stainless steel is the cleanest option as far as toxicity is concerned, but on a budget and for functionality the Ziploc or Rubbermaid containers will certainly work.  They are BPA-free, that is a plus.  You mainly need to be concerned if the plastic will be heated up with the food or if hot food is placed into the plastic container.  That is when the most chemical transfer occurs from the plastic into the food.  I also like using the Ziploc bento for younger children instead of the stainless steel because it is lighter weight and easier to carry for little arms.  It's also budget friendly and recyclable, in case it accidentally gets left at school or lost on the bus -- easy to replace and no tears over the loss.  We use both stainless steel and the plastic Ziploc personally.

Klean Kanteen
-  18/8 grade stainless steel water bottle.  I can't stress it enough how important it is to send your child to school with a water bottle.  Even if the only time they'll drink from the water bottle is at lunch, at least you know that some of the water they drink at school is clean filtered water.  Drinking fountains are dirty and pump out tap water.  And you don't want them drinking bottled water from a vending machine because you don't know if the bottles were heated up in transport causing plastic leaching, let alone where that water came from either.  Talk to your kids about the importance of staying hydrated and the health benefits (proper hydration = ability to focus!).  I like the colorful Klean Kanteens or the Disney themed stainless steel Thermoses.  If it's colorful and fun, kids are more likely to use it!  Have your child pick out their favorite color!  *TIP* Chill the bottle in the fridge over night for maximum chilling power through the day at school.

Thermos brand food container
-  Hot food containers.  It's a great idea to switch it up from the same mundane lunches week after week.  When you're feeling in a rut, send them in with a hot lunch of soup, oatmeal, or leftover casserole from dinner.  Thermos brand has fun Disney themed options for these as well, or LunchBots also makes a thermal option.  *TIP* To get the max 5-6 hours of hot insulation out of these thermal cups, warm them up first by pouring boiling water inside and let sit for about 10 minutes.  Dump water out and add piping hot food and seal.  Add to sack lunch and ready to go!  It'll still be hot a lunch time.

-  Eating utensils.  I am a huge fan of reusable whenever possible.  Reduce and reuse.  It's also often the healthier option.  I think I shared my favorite bamboo eating utensils in a past Christmas gifts post, but here they are again.  You can also get camping style compact titanium utensils which are super light weight.
Titanium Spork
KOKO FreshPocket lunch bag
-  Lunch bag.  It's a good idea to still use a lunch bag to carry everything in, even if you're using a bento box, just in case something leaks.  A good quality lunch bag can also be chilled and will have room to store ice packs to keep your lunch fresh.  Look for something that opens on the side rather than the top.  This allows you to maximize your packing space.  This is the one that we use personally, the KOKO FreshPocket (just ignore the fact that they call it "the man's lunchbox" lol!).  It's the perfect size to fit everything, including a Thermos water bottle!  And with 2 ice packs in the built in compartments, it keeps our food cool for about 5 hours while sitting at room temp.  I have heard these Neoprene purse style bags are fabulous at insulating when ice packs are used, and they're roomy with extra stretch for large load days.  I see Thermos has their own kids lunch bags, and I do love the quality of their brand so I'd trust these bags to try them (and can't go wrong with that price!).

Fun Rubbermaid icepacks
-  Ice packs.  You probably already have a few in your freezer ready to go, but I had to share the CUTE ones a family I used to work for had for their children.  They are from Rubbermaid.  Each child had their own animal.  It was a cute way to personalize their lunches and keep them engaged.  We, personally, use the ice packs that are slim designed.

Reusable fabric baggies
-  Instead of plastic baggies.  Again, I am all about reduce and reuse.  Also, the type of plastic that is used to make plastic wrap and plastic bags is one of the worst as it easily leaches the plastic into the food it touches without heat exposure.  For long term cost savings and instant health promotion, switch to stainless steel containers, glass containers, reusable cloth type baggies, or stronger and safer plasticware like the Ziploc storage bentos.

Mini silicone push pop molds
-  Homemade push pops or 'gogurt'.  This is by far one of my favorite whole food lunch ideas.  I found these push pop style silicone molds that any kid is sure to love!!  We use them and looove them and we're big kids!  They're so easy to use, just pour in what you want to freeze, pop on the cap and it's ready to freeze.  I'll fill them with leftover smoothie, coconut milk mixed with lime zest, Greek yogurt and fruit, pureed mango with coconut milk, and (on the rare chance we have any leftover) homemade ice cream.  After a few hours, the consistency will be more like soft serve, but it's still really fun to roll up the bottom of the tube to eat your frosty treat.  Here is another brand in the same size.  They also make a mini size -- so cute for kindergarten/1st grade!  The trick in using these successfully over and over again is to wash them the same day, and get one of those bottle brushes, the skinny kind, to get all the way down to the bottom.

Too cute! - lunchbox art
-  Make food fun.  Cut veggies and fruit in fun shapes and design food art out of your shapes.  It's the fun little touches that excite your child when they open their lunch box and help them have a good time while eating healthy.  Believe me, there will be a kid chomping away on a cupcake, candy, or some food your child would rather have, but food art could help make the less desirable healthy foods 'taste' better!  Use cookie cutters you already have, or pick up some fun new ones.  Get creative!  Have your child help you pack their lunch the night before and let them design with the shapes.  Some ideas:  stars and flowersChristmas, flowers and leaves, classic circles, animals, butterflies and flowers, or plane, train, racecar.

Cloth napkins from Etsy seller GreenLittleNest
-  Cloth napkins.  Reduce and reuse, right?  You can make your own cloth napkins with your child, or help them pick out a colorful set of their own for the school year.  Cocktail size would be perfect!  A pack of 5 or 6 will be enough to get you through each school week.  Just toss them into your laundry load each week.  You actually save $$$ this way, and keep napkin waste out of the trash!  Here is a cute set from Amazon.com, or you can find lots of cute options on Etsy.com.


Come back tomorrow!  I'll be sharing some tips for planning lunches in advance.

Friday, August 17, 2012

Top 5 Natural Birth Control Options

We're going a little PG-13 with today's post.  Continue with discretion!

Recently I had a follow up consult with a women who is new to our Maximized Living clinic.  She is middle aged, single, and completely embracing the 5 Essentials of Health.  She gets her spine adjusted regularly following her corrective care recommendations.  She's been doing the Advanced Plan strictly for a few months with weight loss and hormone balance as her health goals.  She has drastically reduced her daily toxic burden by switching to all natural body care products, make up, and cleaning products.  She is burst training at least three days per week.  And WOW has her mindset done a 360 in the last few months -- from a negative "I'll always be sick" mindset to a positive, glowing, "I'm in charge of my health" mindset toward change!  I am so proud of her!

During this follow up appointment, we were to discuss where she is at with meeting her health goals (weight and menstrual/hormonal issues) and talk about ways to speed up her healing process.  The biggest issue this woman wants to overcome is regulating her menstrual cycles and getting her hormones back in sync.  I have explained to her it will take some time, and that toxicity is the major component to an estrogen imbalance.  Not wanting to go back on a synthetic birth control pill, patch, or IUD, she asked about natural birth control options.  "What do you use?" she asked.  She knows that I will not put my health at risk by using something that is potentially toxic or messes with the natural cycle of my body.  I gave her my recommendations, and thought many of you could benefit from knowing the truly natural options that are out there for pregnancy and birth control.

Elise's Top 5 Natural Birth Control Options

#1 - Fertility Awareness Methods & Natural Family Planning

Fertility awareness methods allow you to identify days in your menstrual cycle on which you are most likely fertile.  Most commonly you see movies and TV showing women using this information to help them get pregnant, or try to.  But did you know that it can be used to help you avoid pregnancy and it is proven 99% effective when used properly?  That's more effective than using a condom or birth control pills/patch/ring/shot!

The only "tricky" part if you're trying to avoid becoming pregnant is that you'll need to either abstain from intercourse during your potentially fertile days or use a barrier method of contraception (like a diaphragm, natural lambskin condom, or the FemCap).  I say it is tricky, because when a women is in her fertile period, she is usually the most aroused.  But even so, this is the birth control method I use personally and have been for about 4 years now.  Once you (and your partner) get in tune with your body, you really learn the warning signs of your fertile period.  And once you learn your body's rythm, it's rather easy to stick with one of the Fertility Awareness Methods.

There are a few different methods out there.  Some work better than others.  Some have a religious stigma.  Natural Family Planning is the type that my husband and I use, and yes we are Christians but that is not the only reason we choose Natural Family Planning.  We use it because it works and is the healthiest for us and our future children.  I actually first learned about Natural Family Planning when my friend Allison gave me a book on it and how to chart.  For about 6 months in a row, I monitored my basal body temperature, cervical mucus, moods, and food cravings on a chart as I learned my body's pattern of fertility.  Once I learned my patterns, I now simply watch the calendar and mark down my flow days, always paying attention to mucus/mood/cravings as warning signs of fertility.  Natural Family Planning has been shown to be the most effective Fertility Awareness Method with a 99% effectiveness rate when used properly. The key is understanding how the method works and sticking to it 100% of the time.

Other Fertility Awareness Methods are not as successful, and also not as involved and detailed.  I won't go into the differences of the methods here for sake of time, you can look into them on your own if you wish.  Other methods are: Standard Days Method,  Symptom-based Method, Ovulation Method, Two Day Method, SymptoThermal Method, and the Calendar Rhythm Method.  Many of these still have high success rates and may be a good fit for you.  Do your research and find your best fit!

Resources I use for Fertility Awareness & Natural Family Planning
Period Tracker App (totally worth paying for the Deluxe version)
FertilityFriend.com (FREE)
Fertility, Cycles, and Nutrition
Sexy Hormones
Taking Charge of Your Fertility

Fertility Awareness & Breastfeeding
Maybe you just had a baby and are wondering how a Fertility Awareness Method can fit in to your sex life?  If you're like me and still breastfeeding, you'll be pleased to know that breastfeeding is God's natural birth control!  Most women will stay infertile until their milk starts to dry up naturally (for most women who do "extended breastfeeding," this will fall around the 1.5 to 2 year mark.  In my research, this pertains to the on-demand style of breast feeding, and exclusive breastfeeding for at least the fist year.  Also, breast milk only.  Doing part-time with formula can signal to your body that baby doesn't need as much milk anymore and your hormones start to switch back.  You can actually become fertile faster by feeding your baby only part-time from your beast.).  But if you find yourself weaning your child sooner than 2 years, begin watching for fertility signs as soon as you begin the weaning process.  You need to have had three regular periods to begin using a calendar-based method.  And to test your basal body temperature, you need to measure it at the same time each morning upon waking after at least 3 hours of restful sleep.  These are some things to think about as you notice your baby beginning to wean.  You could ovulate before your first period returns while breastfeeding.  I am finding, personally, that cervical mucus is the best indicator of fertility while I am still breastfeeding.  I continue to monitor daily for any changes...and so far, 11 months in, no changes since giving birth.

#2 - CycleBeads
CycleBeads are an affordable way to help make the Fertility Awareness Methods easier.  The beads can be used either virtually on your computer/phone or physically hands-on to monitor your cycle.  CycleBeads are a color-coded string of beads representing a woman's menstrual cycle.  You move the rubber band around the bead string each day of your cycle.  Different color bead represent different days of your cycle so you'll know when you are fertile and when you're not.  Read more on CycleBead's website here

#3 - Lady Comp
This machine runs on the higher end compared to everything else we're discussing today, BUT I can see why people fall in love with their Lady Comp.  I don't own one myself, but would seriously love to try one out for a while.  It takes the guess work out of Fertility Awareness!  It's a computer that does all the fertility monitoring for you.  You keep the small device on your night stand and take your temperature orally every morning at approximately the same time.  Once it gets about 3 cycles worth of data, it will give you a Red light for "No" or a Green light for "Go" whether or not you can have sex that day.  HOW COOL!  I have friends who use this machine and that's all they've ever had to use, no worrying about numbers or phone apps or graphs or calendars.  I hope to try it myself some day!  Check out Lady Comp's site or buy one here.


FemCap
#4 - FemCap
I have not used a FemCap or a diaphragm personally, but many many many of my girlfriends use the FemCap and tell me they prefer it over a regular diaphragm.  FemCap is a non-hormonal latex-free contraceptive device made of silicone.  It is reusable and hand washable with soap and water.  My friends that use the FemCap tell me they like it as their regular birth control method because it is has fit to their size options (never pregnant, c-section, or vaginal birth) but doesn't require a professional fitting with their midwife or OBGYN.  And they say it just feels good in, no pain or discomfort, as well as easy to remove.  You can read more on FemCap's website to see if this option is the best fit for you.  Diaphragms have a 90% effectiveness rate.

#5 - Natural Lambskin Male Condoms 
Natural lambskin condoms are made from the intestinal membrane of a lamb, and, believe it or not, are the oldest type of all condoms.  There are records of lambskin condom use during the early part of the Roman Empire.  Kind of amazing if you think about it... The other condom options out there are made of synthetic latex or polyurethane, both highly toxic and used to make things like mattresses, paint, and tires.

In case you need a condom for other than just birth control, you should know that small natural pores in the lambskin condoms make them ineffective in protecting against sexually transmitted diseases.  The viruses that cause STDs can enter through the pores.  Lambskin condoms do provide pregnancy protection since the pores are too small for sperm to pass through.  Find natural lambskin condoms here.  Natural lambskin condoms have a 95% success rate.

Copper IUDs Did NOT Make the List
Copper IUD
In general, I am not a fan of inserting foreign man-made objects into my body for any amount of time, let alone 10 years!  I am against both the copper IUDs and the hormone IUDs.  The latter is a given (the artificial hormones!).  Why copper in the first place?  Copper kills sperm.  But, does that mean we should put copper in our vaginas??  Maybe you have seen the recent (ParaGard) commercials on TV for, what the drug companies are marketing as, the "natural copper IUD" or "safe copper birth control."  I strongly disagree.  The copper in IUDs is absorbed by the body over time, and yes it is possible to get copper poisoning.  It takes about 2-3 years for your body to build up so much eroded copper from the IUD that symptoms get so intense that your immune system crumbles.  But even a little too much copper in your blood stream throws your hormones off and causes extreme immune compromised health symptoms. And remember, this copper leaching happens to EVERY WOMAN who uses a copper IUD.  It is listed as a risk on ParaGard's packaging.

And, did you know there is a 1% chance that you can get pregnant while using the copper IUD??? (That is the same effectiveness as the Natural Family Planning method, but the copper IUD is toxic to the body!)  I alone have 3 close girlfriends who each got pregnant with the copper IUD inserted for many months prior.  And the chance of having an ectopic pregnancy if you do get pregnant with the IUD in is high.  For me, that's too many risks, plus the laundry list of symptoms that can go along with the IUD.... I'll pass and stick with a truly natural method by listening to my body for ovulation signs.

That is my Top 5 list for natural and non-toxic birth control.  Do you have a natural method you'd like to share?  Comment below!

Tuesday, July 24, 2012

Product Review + GIVEAWAY: 100% Pure

It's about time for another giveaway here at Healing Cuisine, wouldn't you say??  The company I am introducing you to today is 100% Pure, and I am completely in love with their products!  In fact I have switched over and now almost all of my make up products are from 100% Pure.  (I am still partial to my MiEssence for face care and concealer, but I still give two thumbs up to the purity and quality of 100% Pure's face care lines!)

I hadn't heard of 100% Pure until earlier this year.  I remember reading an article in a magazine about it and was intrigued to learn that they are the only US company to use patent-pending technology using fruit pigments and extracts to color their products naturally.  From there, I visited their website, talked with friends about their products who were long time users, and eventually I had to email the company for more information and to talk with someone about setting up a giveaway for you guys -- because you have to learn about 100% Pure, this company that is taking care of women and the toxic burden placed on our bodies by society!

BACKGROUND OF 100% PURE

100% Pure is an organic cosmetic company that has over 500 different cosmetic products (categories: fruit pigmented cosmetics (patented/patents pending), skincare, bath & body products and haircare).  The company is still a baby, having launched in California just 7 years ago in 2005, but the business is growing rapidly due to the high demand for their natural products.

100% Pure’s vision began when Susie Wang partnered with her boyfriend Ric Kostick and her brother, James Wang, because she became disillusioned while working as a skincare formulator for some of the world’s largest cosmetic companies.  Wang discovered how toxic some of the chemicals were that are commonly used in cosmetic formulas when formulating an eye cream and a chemical spilled onto the lab table and eroded it.  Shocked at how harsh this chemical was, Wang got passionate about creating a line that is truly 100% Pure...a line that is free of harsh detergents, artificial fragrances, chemical preservatives or any other toxins.

100% Pure formulas are vegan (or vegetarian when honey is used), never tested on animals and the makeup brushes are made from synthetic fibers instead of the traditional fur that most makeup brushes are made from.  100% Pure is a green company - all formulas are biodegradable and packaged with environmentally friendly materials such as post consumer recycled soda cans, recycled water bottles, bamboo pulp, recycled paper and recycled glass.  All printing is done with non toxic vegetable ink on all packaging, catalogs and other marketing materials.  ((I LOVE THIS!!))

While picking blackberries one summer in her organic garden, Wang discovered how beautifully the berries stained her skin which gave her the idea of using these healthy pigments in cosmetics.  Recently patented in the EU with China and US to follow, 100% Pure is the only cosmetic company that uses fruit and vegetable pigments to color cosmetics.  The benefit of fruit and vegetable pigments versus the other traditional ways of coloring cosmetics (synthetic dyes or minerals) is that fruit and vegetable pigments contain an abundance of antioxidants and vitamins.  ((This is why I have switched to my eye shadow, lip gloss, mascara..etc..all from 100% Pure))

PRODUCT REVIEW:  BLACK TEA MASCARA
fruit pigmented, truly natural


I've got to tell you, I am very, very, very picky about my eye make up and especially mascara.  I was born with a permanently clogged tear duct in one eye and without one in my other eye.  My eyes are unable to cycle and filter their tears, so my eyes are very sensitive to allergens and chemicals.  I can tell within just minutes of applying mascara whether it will affect my eyes or not.  Basically I have never been able to wear much makeup or mascara.  I've tried all the "natural" brands.  To date, MiEssence had been the only brand that was pure enough that I could wear their mascara for an entire day with little issues.  That was until I discovered 100% Pure's mascara!

The company was so kind to send me a tube of their Black Tea Mascara to sample and test on my sensitive eyes.  I tested it out for the first time on a day I knew Austin and I would be home all day, in case of an adverse reaction.  I knew I probably had nothing to worry about after reading the ingredients of the mascara (read them here) - everything listed was natural, organic, and I didn't see any vague terms that could be away to hide something bad (always gotta watch out for that!).  After trying it out, I can't tell you how ecstatic I am about this mascara!!!

First of all, when you open it up, it smells like blackberries with a hint of coffee!  I had no reactions at all after applying.  I am able to wear this mascara all day, multiple days in a row, with no pain or reaction.  And by my personal standards, that means this product is pretty darn close to being a whole food (not far off for sure after reviewing their ingredients!)!  When wearing it, you barely notice it's on your lashes because it is so light and soft.  I swear my eye lashes are healthier now after a month of using the Black Tea Mascara, too!

I am so happy to have a honest, natural mascara that I can actually wear.  This mascara seems to give a good fullness and lengthening affect that we women want for our peepers.  The brush really adds to the lengthening effect.  It is a unique shape, and actually has a wave to it.  Oh yeah, and no clumping!!  All other natural mascaras usually clump on me and I have to comb through to get the right look.  Not the Black Tea Mascara.  It glides on perfectly, even with two coats!  I am very satisfied and will continue to use this product every day!  And check it out.  Yes, I did an infomercial-esque before & after shot.  ;)

MASCARA GIVEAWAY

All eyes are on you now!  100% Pure also sent me 2 Black Tea Mascaras to giveaway to two of you!

The Giveaway Contest will run from Tuesday July 24th until Monday July 30th at 11:59pm.  I will use Random.org to select the winner and announce it here at Healing Cuisine at 9:00am on Tuesday July 31st!  TWO lucky winners (open to U.S. and Canada residents only) will receive a full size tube of 100% Pure's Black Tea fruit pigment mascara.

HOW TO ENTER

Leave a comment below for each of the ways you chose to enter.*  (If you have already done one of the following in the past, it still counts as an entry this time! - e.g. "I'm already a follower of Healing Cuisine on Twitter."  Simply leave me a comment below stating it and your entry still counts!)

        -  (1 entry)  'Like' 100% Pure and tell Susie Wang which product of 100% Pure's you love most (or are most excited to try) on their Wall

        -  (1 entry) Follow Healing Cuisine on Twitter  (my handle: @EliseJSchwartz)

        -  (1 entry)  Follow Healing Cuisine via Google Friend Connect, leave the name/username you subscribed as in your entry

        -  (2 entries)  Subscribe to this blog via email (located on right column), leave the email address you subscribed as in your entry

        -  (2 entries)  'Like' this post on Facebook

        -  (2 entries per day)  Tweet this daily:  “Healing Cuisine giving away @100percentpure fruit pigment Black Tea #Mascara! Enter today! http://www.healingcuisinebyelise.com/2012/07/product-review-giveaway-100-pure.html @EliseJSchwartz #giveaway"

*All winners entries will be verified.

Tuesday, May 22, 2012

Natural Cleaning Week: All My Favorites!

I'm back!  And happy to be!  Hope you all enjoyed the beautiful weekend!  It was sunny, hot, and not humid (for a change) here in Charlotte.  Family tells me the midwest and upper east coast were likewise.  Hope you had some outdoor fun before returning to the regular schedule on Monday morning.  :)

I've got to play catch up around here...  It's a little embarrassing, I never finished off Natural Cleaning Week before my life exploded with busyness.  I'm going to list off the last cleaning and deodorizing recipes all in this final post.  Sound good?  These are the rest of my favorite all-natural ways to freshen the home!  If you have some fun and must-try recipes to share, please do so in the comments section below or on our Facebook page!


Natural Cleaning Solutions (mixed bag of my favorites)

1.)  For hard water stained toilets, if vinegar and baking soda doesn't seem to be enough, add 3 fizzing denture tablets to the bowl before bedtime.  Give it a good scrubbing with a stiff toilet brush in the morning.  Sure beats all that wrist work using pumice stone.

2.)  Fabric and Room Deodorizer: In a clean spray bottle, add 1 cup vodka, 1 1/2 cups filtered water, and 1 Tablespoon of baking soda.  Shake the bottle gently until the baking soda dissolves.  (You can add about 15 drops of your favorite pure essential oil.  I use a therapeutic grade oil, like Thieves blend or Lavender.)  Spray into the air, on your couches, curtains, carpets, and car seats! The vodka will not leave any alcohol smell or stain, but it will help to deodorize the fabrics.

3.) Bathroom Air Freshener:  Fill a Mason jar about 3/4 full with baking soda, 12-15 drops lavender essential oil (or other oil scent you prefer), and dried lavender flowers (optional - added for a pretty look).  Place a square piece of scrap fabric over the top and screw the cap ring around.  Set on counter or back of toilet for natural freshening for months.  Change baking soda a few times a year.

4.)  Greasy Grimy Stove Tops: This works especially well for flat tops.  Sprinkle the baked on grime with baking soda and spritz with a little warm water, just to form a paste.  Let sit about 15 minutes.  Wipe away with a damp rag.  If you have an electric or gas range, you might enjoy this tip -- remove the grates and burners, and vacuum all the crevices before doing a wipe down.  You won't believe the crumbs that find their way under the burners, and it's 1000 times easier to suck them all up than try to catch them with a rag.  I vacuum my stove top a few times a year for maintenance.

5.)  Oven Cleaner:  Moisten the inside of the oven with a light spritzing of water or by using a damp sponge.  Sprinkle all surfaces and sides with baking soda.  Let sit overnight.  Remove with spatula and wipe clean with water.  Rub gently with fine steel wool on tough spots.

6.)  Drain Cleaner: Pour about 1/2 cup baking soda down the drain, then 1/2 cup distilled white vinegar.  The resulting chemical reaction can break fatty acids down into soap and glycerin, allowing the clog to wash down the drain.  After 15 minutes, pour in boiling water to clear residue.  Caution: only use this method with metal plumbing. Plastic pipes can melt if excess boiling water is used.  Also, do not use this method after trying a commercial drain opener--the vinegar can react with the drain opener to create dangerous fumes.

I hope you have learned something new through this week+ of natural cleaning solutions!  You can now safely clean you home from top to bottom naturally.  We'll be back to food recipes on Thursday!  Come back then!  :)

Thursday, May 10, 2012

Natural Cleaning Week: Tub & Tile

We're winding down our week of Natural Cleaning Tips.  I've got to say, the question I get emailed most often when it comes to natural cleaning is how do you do your bathrooms without chemicals??  Okay, I'll share my secrets with you...  And yes, it is completely possible to eliminate soap scum and moldy build up without the use of harsh chemicals!

Now let me shamelessly put in a plug right now for you to switch to all-natural body care products.  If you're not sure if what you're currently using is natural or not, look it up on the EWG's Cosmetic Database.  The majority of soap scum buildup and slimy residue comes from the chemicals left behind from toxic body care products.  You'll find after switching to natural methods of body care, your bathroom will stay cleaner longer, and require less scrubbing maintenance in the future.

For the counters and toilet I use my All-Purpose Spray mix.  For the toilet bowl, I add a few splashes of distilled white vinegar and a good scrub with the toilet brush.  (If you have hard water or lime stains, use 2 cups of vinegar and a few Tablespoons of baking soda and scrub away.)  And for the mirrors, I use my Window Spray mix.

For some bath tubs and tiles, the simple All-Purpose Spray will do the job.  For tougher tubs and tile stains, you'll need a little stronger mix.  Here are my methods:


Stained Bath Tubs

bristle brush
borax
water

1.)  Wet the bathtub and drain out any remaining water, just so that the stains are moistened.  You can use plain water, or spritz with the All-Purpose vinegar spray.

2.)  In a small bowl, add some borax powder.  Judge by the size of your stains how much you may need.  Add water to the borax a few drops at a time, stirring with a metal spoon until a paste forms.

3.)  Apply the paste to the dirty tub.  Let sit for 10-20 minutes.  Scrub with a bristle brush, the stains should dissolve away with little work.


Dirty Tile Grout

hydrogen peroxide (3%)
baking soda
clean rag or old toothbrush

1.)  First, remove any surface dirt/scum with a good wipe down with the All-Purpose spray.  In a small bowl, add some baking soda.  Judge by the size of your grout/tiles how much you may need.  Add hydrogen peroxide a few drops at a time, stirring with a metal spoon until a paste forms.

2.)  Apply the past to the dirty tile grout.  Let sit for 30 minutes.  Wipe away with a dampened rag, or for tougher stains, scrub with an old toothbrush.  Finish with a rinse of the entire wall/floor of tile.

Tuesday, May 8, 2012

Natural Cleaning Week: Carpets & Stains

We're talking carpets and stains today, as part of the 22 Day Spring Clean Challenge.  I am almost finished with my 22 Days...just two more left!  Where are you at???  I challenge you to take a read through the list and start your own countdown to a spring clean home NATURALLY!  And that's what this week is all about, after all.  I am sharing my personal all natural recipes and methods to get your home squeaky clean.

It's good habit to give your carpeting a good washing once a year.  This will get the deep down dirt and dust that has built up over the year out.  AND it will eliminate bacteria, allergens, mold, and dust mites, all known to make our indoor air (and us) sick!  You will need a personal carpet cleaning wet vac or you can rent one and use natural ingredients instead of the commercial detergents (which are toxic!).

If you have stains or spots on your carpet, maybe left by pets or wine, you will also need a carpet brush or, to stay green, use an old toothbrush.


Natural Carpet Cleaning

STAINS
carpet brush
about 2 tsp baking soda (more/less depending on size of stain)
1/2 tsp castile soap
1/4 cup hydrogen peroxide

CARPET
distilled white vinegar
distilled water
essential oil, optional  (I use Thieves)

1.)  First, pretreat noticeable/tough stains:  Vacuum the entire carpet thoroughly.  Sprinkle a light layer of baking soda over the stain, make sure all edges are covered.  In a small bowl, mix 1/2 tsp of castile soap with 1/4 cup hydrogen peroxide.  Pour the mixture over the baking soda.  Gently push the paste that forms down into the stain with the brush, being careful not to scrub it or split the carpet strands.  Blot with a clean dry towel to remove any standing liquid, then let dry (about 24 hours).

2.)   Fill the carpet cleaning vac with 1 part white vinegar to 2 parts distilled water.  Run the cleaner across the carpet, following manufacturer's instructions.  Follow up with a rinse of only distilled water (and a few drops of essential oil if you wish), especially over the baking soda spot pretreatments.  Let carpet dry fully for 24 hours.  Finish with a thorough vacuuming to pick up any fibers or dirt particles left from the cleaning.

And it's as simple as that, folks!  Your carpet will be refreshed and sanitized, and last longer from great maintenance!  And soft -- did I forget to mention your carpet feels softer after it dries?  Your feet will thank you.  :)

Monday, May 7, 2012

Natural Cleaning Week: All Purpose & Floors

It's still Natural Cleaning Week, where I am sharing my personal all-natural cleaning methods and recipes with you in response to the 22 Day Spring Clean Challenge.  Today I'll be sharing my two all-purpose cleaning sprays and floor cleaning solutions.  I've even got a great regimen for hardwood floors, so stick around and read on!

All Purpose Cleaning Spray

My regular all-purpose cleaning spray is the following recipe.  Simple to mix up and very affective.  I choose to add a few drops of Young Living Thieves oil for added sanitation, but vinegar alone has been shown to kill germs on contact.  Before I found Thieves oil blend, I used to use Wyndmere's Bacteria Fighter.  It worked great at sanitizing, too, and smells so fresh!

All Purpose Cleaner

1 part distilled white vinegar
1 part filtered water
a few drops of Thieves oil  or Bacteria Fighter (OPTIONAL)
(you may also like to try your own blend of oils, such as lemongrass, tea tree, lavender, clove, orange, mint, eucalyptus)

Add all ingredients to a clean spray bottle (order spray bottles in bulk to save money).  Shake to mix, and ready to use.  Safe to use on just about anything, even stainless steel!

If you've got to clean up a mess that is extra greasy, like my kitchen the other night after I made fried salmon cakes and splattered oil all over my walls and counter....  You'll need a little added grease-cutting boost to your cleaner.  Here's what I do:

Degreasing Cleaner

1 cup distilled white vinegar
1 cup filtered water
1/4 cup baking soda
1/2 tsp castile soap
5 drops tea tree oil  (OPTIONAL)

Add all ingredients to spray bottle and shake to combine.  Ready for use!  (And it is normal for the baking soda to foam a bit when added to the bottle.)

FLOORS

For tile/vinyl/linoleum/painted wood/stone floors, I use these same solutions, simply in a 3 gallon bucket.  Dunk mop in the All Purpose solution and wring as dry as possible (I prefer to use a cotton string mop or strip mop.  Strip mops are easier to wring out.).  You can let your floors air dry.  For really dirty floors, with mud or caked on food, the degreasing cleaner is fabulous!  Spray any big stains or dirt spots to pretreat for about 15 minutes -- this will cut down on your scrub time and effort.

For hardwood floors, you can use the general All Purpose Cleaning recipe above.  Make sure mop is wrung out until almost dry, and always follow up your wood floor mopping with a dry mop or towel to soak up any leftover moisture that can warp or damage the wood.  About four times a year, you can mop your floors with a hydrating and shine treatment:

Hardwood Floor Hydration & Shine Treatment
Use no more than 4 times per year to prevent oil buildup

2 cups distilled white vinegar
2 cups olive oil

Add ingredients to a bucket and use a whisk to combine.  Dip clean mop in and wring it out as well as possible, until it's barely damp.  Mop hardwood floors like normal.  Follow up with a dry mop or towel buff to soak up any left behind moisture.  Your floors will shine like new, and will appreciate the renewed hydration!

Related Posts with Thumbnails