I'm back, after a short hiatus last week. Dave and I have been
working hard on plans for our future Greensboro, NC clinic. We are
currently in the south Charlotte area (side note: I am SO HAPPY the
Democratic National Convention is over! Life can go back to normal for
us all finally. We live within a mile of the hotel where all the stuff
was happening and the President was staying. Sounds cool, but let's
just say we were counting down the days... Friday was a happy day!).
We are planning to eventually move north a couple of hours to Greensboro
to open our Maximized Living health center and raise our family. Plans
are starting, more news soon as we know more details. I am getting
excited though!! It's sounding like 2013 will be the year!
I'm
happy to be back to finish up our series on Whole Food School Lunches.
This is Part 3 where we'll be talking about Menu Planning. In case you
missed it, you can find
Part 1 and
Part 2
here. After this breakdown of how to plan your weekly menus with your
child(ren), I'll share a few new recipes that will spice up the lunch
box experience for your kid(s) to keep them happy and engaged.
Each month, I keep a tally of how many consultations I do with you guys and
what types of consultations.
Lately, each month I am shocked by the outcome. It used to be that
what people needed the most help with was detoxification and customized
recipes for allergies. Now, since about January, you guys are coming to
me for help with Meal Planning. That is by far the most requested
consultation I am getting from you. Today I'm sharing some of my tips
with you for free! I'm hoping some of today's post will help with your
lunch planning needs. And enjoy the two PDF templates for free as
well.
LUNCH PLANNING 101
I
love it when a parent implements a meal planning routine with their
child. Not only are you teaching your kids life skills that they will
use later in life on their own, but you are also opening the door for
nutrition and health conversations. You can help your child understand
the importance of eating whole foods vs. processed foods, what it means
to drink half your body weight in ounces, why sugary beverages can make
you sick, and the differences between healthy proteins-carbs-fats vs.
unhealthy options.
We're talking about planning lunches on a
whole food,
real
food lifestyle. Whether your child is following the Advanced Plan or
Core Plan, or maybe you are in the baby step stage of just getting your
family to eat whole foods. All of today's tips will help you! I would
just like to explain that while balanced eating is very important
(Protein, Carbs, Fat in each meal), it's not about calorie counting or
measuring out exact grams or cups of foods. When you are eating whole
foods, simply make sure that each meal contains a Clean Protein, a
Healthy Carb, and a Good Fat and you are set. Your body knows what to
do, and as long as you are eating enough for your body size (bigger
portion for an adult, smaller portion for a child), you will stay full
for 3-6 hours from meal-to-meal.
THE PROCESSPick
a day that you and your child will sit down and plan your month's (or
week's) worth of school lunches. For us it is the last Thursday of
every month. Start by having your child tell you what he/she would like
to see in their lunchbox. It's important to send them off each day
with a balanced meal. I've created a Favorite Lunch Foods worksheet
that you can fill out with your child (pictured below,
download it here).
Ask them to list their favorite foods in each category: Clean Proteins,
Healthy Fats, Vegetables, and Fruits. Always include a bottle of fresh
filtered water with every lunch (I like to use a
Klean Kanteen). Use this list of favorite foods as your crutch while planning the month/week's worth of lunches.
Once
you have each child's favorites recorded, work together to mix and
match the categories to create complete lunch meals. I've created a
Lunch Menu Template for you to use as your guide (pictured below,
download it here). It's in a weekly format, however I recommend planning your lunch menus out a
month in advance.
This sets you up for success, giving you ample time to plan, shop,
prep, and prepare. You may find once you get the system down, that you
can cook once a month and make enough food for the freezer to use in
lunches for most of the following month. Remember to refer back to my
School Lunches Part 2
discussion on preparing lunch meals in advance. Also, save each week's
menu template after you fill it out. Reuse it each month or every
other month to further simplify the menu planning and save you time, or
at least use it as a guide and make adjustments as needed based on
seasonal produce!
12 EXTRA LUNCH PLANNING TIPS
 |
| Decide to start today! |
1.) Do it.
As with any goal, the first step is making the commitment. The second
step is following through and doing it. You can't just say you're going
to do it, you must
decide you will do it. Set a date to start
taking action. Talk to your spouse and kids to get them involved in the
meal planning process. Have them help hold you accountable.
2.) Shop strategically.
Pick a day to do your grocery shopping that works best for you. For
me, it's Sundays after 3pm. Consider your schedule, then cross
reference it against how busy your farmer's market or grocery store may
be at that time. Sometimes it's better to wait until later in the day
to shop. Also, consider your market's schedule. Ask the store manager
when they receive fresh shipments on produce. And stay flexible with
your shopping list. If you're planning on romaine but the spinach looks
better, go with the spinach.
3.) Consume perishables first.
When putting your weekly meal plans together, send your kids off to
school with the most perishable items first so nothing goes to waste
later in the week. In my house we have salads or lettuce/kale wraps on
Mondays and Tuesdays.
 |
| Grade your efforts to make improvements. |
4.) Grade your efforts.
When your child brings their lunch box home, have them grade how they
liked their lunch. Have them write a grade, A-F, on the weekly menu
planner or use a number system, 10-1. This opens the door for
communication about what they really did or didn't like about that day's
packed lunch. Together, you can make adjustments for next week.
5.) Budget smart.
Budget your time, budget your money. Using a monthly planning system
allows you to buy foods in bulk to save the most money. You'll also
spend much less time planning one day a month rather than every single
day. Plan to use Sunday dinner leftovers in Monday's lunch. And when
certain foods are on sale, like chicken, avocados, or cauliflower, buy a
bunch and freeze it for later in the year. You can even make double
dinners and freeze the 2nd portion for lunches later in the year.
 |
| Seasonal foodpicks add pizazz! |
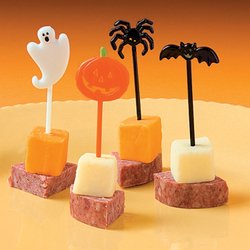
6.) Looks count.
Make an effort to keep the packed lunches looking attractive. A
variety of food colors each day is a great start. You can also include
fun freezer packs (I like
these ones by Rubbermaid, get a few to switch it up!) or use decorative items like
cookie cutters to shape the cheese/fruit/veggies or foodpicks
like this one or
this one
with a fun toppers. And, your child is never too old for an
encouraging note, a picture, or a funny drawing from you included in
their lunchbox.
7.) Variety is key. Planning ahead means
you'll have time to add variety to your kids' lunches. Throw in a few
new foods each week that are not on your child's Favorite Foods list.
If you're dealing with a picky eater who is likely to throw out the new
food before trying it, instead try introducing new foods at dinner time
first. You can keep a watchful eye while your child responds to the new
food. Then open dialogue about including it in their lunches in the
future.
8.) Stick to the plan. Map out your shopping
list in detail to avoid buying processed foods or high sugar content
foods. When shopping, stick to your grocery list for your kids'
lunches. You don't want to forget anything that could compromise the
week's menu.
9.) Establish portion size. For many
parents, it's trial and error to figure out how much food is enough for
your child to get through the day. Growth spurts, extra activity during
the school day, and many other things can impact how much food a child
needs during the day. Roll with the punches and continue to try your
best to meet his/her needs.
 |
| Larger size compartment lunchbox. |
10.) Design a template.
Depending on the age of your child, they may need more than 1 serving
of Protein, Carb, and Fat at lunch time. This is true especially for
Middle School and High School age kids. Talk with your child about how
much food they need during the day, and together design a template to
follow for preparing the lunches. Some kids may need as much as 7-10
different food items to take enough food in to match their growing
adolescent body. For larger size lunches, you may need a bigger
bento type box, or
two of them, or something like this
stackable style Ecobox.
11.) Schedule baking day.
If you set yourself up for success, it will come more easily. Schedule
a day or two times during the week that you will bake lunch and snack
items. For me, I do our family's shopping on Sunday evenings. Tuesday
mornings once a month are for baking and making freezer desserts. I
actually only bake once or twice per month, making enough to store in
the freezer for the rest of the month. Putting the date on your
schedule specifically for baking will encourage you to get it done.
12.) Be mindful of allergies.
This is a good tip not only for the safety of others, but to ensure
your child is eating only the food that you packed for them. Talk with
your child about how food allergies make it particularly important that
everyone eat their own packed lunch. If a fellow student has a food
allergy that you don't know about, something in your lunch could trigger
a reaction. Eat what mom or dad gave you and only that, no trading.


